Difference between revisions of "PT Sync Multi Server Configuration"
From ADF Docs
(→Configuration) |
|||
| Line 3: | Line 3: | ||
The steps below identify the configurations to setup and configure. | The steps below identify the configurations to setup and configure. | ||
| − | |||
| − | |||
| − | |||
| − | |||
| − | |||
== Configuration == | == Configuration == | ||
| Line 52: | Line 47: | ||
[[File:pt_sync_multi_server_config1.jpg]] | [[File:pt_sync_multi_server_config1.jpg]] | ||
| + | |||
| + | |||
| + | == Enable Multi Server == | ||
| + | # Navigate to the [[PT_Sync_Ext_App_Configuration|App Configuration Manager]] page. | ||
| + | # Edit the record and open the "Features" tab. Update the "Enable Multi Server Configuration" field to "True". | ||
| + | # Submit the form and [[Reset ADF|Reset the ADF]] for the server and site. | ||
| + | # Edit the record again and now the "ptSync Configuration" tab will have the servers and sites configured in the XML file populate the select fields for Source Site and Destination Site. | ||
| + | # Select the correct and site under the correct server. | ||
| + | # Submit the form and [[Reset ADF|Reset the ADF]] for the server and site. | ||
| + | |||
| + | |||
[[Category:PT Sync]] | [[Category:PT Sync]] | ||
Revision as of 01:57, 7 October 2011
Overview
The following feature is implemented to sync custom element data across multiple CommonSpot servers and sites.
The steps below identify the configurations to setup and configure.
Configuration
- Within the PT Sync App directory, locate the following XML file (/ADF/apps/pt_sync/site_files/_cs_apps/config/ptSync.xml).
- Copy this file into the source site directory (/_cs_apps/config/). If the directory does not exist, then create it.
- Update the XML file that was copied into the source site. The XML file is formatted to build a relationship for CommonSpot servers and the sites within the server.
- The following example with setup the configuration for a server named "csServer1" and contains two sites named "mySite1" and "mySite2". Also, another server named "csServer2" and contains a single site named "myOtherSite1".
<?xml version="1.0" encoding="utf-8"?>
<settings>
  <SERVERS>
    <csServer1>
      <id>1</id>
      <display>CS Server 1</display>
      <url>http://csServer1/</url>
      <SITES>
        <mySite1>
          <id>1</id>
          <display>My Site 1</display>
        </mySite1>
        <mySite2>
          <id>2</id>
          <display>My Site 2</display>
        </mySite2>
      </SITES>
    </csServer1>
    <csServer2>
      <id>2</id>
      <display>CS Server 2</display>
      <url>http://csServer2/</url>
      <SITES>
        <myOtherSite1>
          <id>1</id>
          <display>My Other Site 1</display>
        </myOtherSite1>
      </SITES>
    </csServer2>
  </SERVERS>
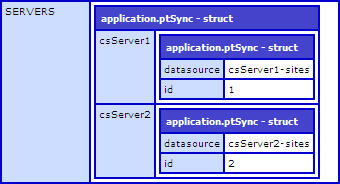
</settings>- The XML data structure in this format will produce the following ColdFusion structure to work with in the PT Sync application config.
Enable Multi Server
- Navigate to the App Configuration Manager page.
- Edit the record and open the "Features" tab. Update the "Enable Multi Server Configuration" field to "True".
- Submit the form and Reset the ADF for the server and site.
- Edit the record again and now the "ptSync Configuration" tab will have the servers and sites configured in the XML file populate the select fields for Source Site and Destination Site.
- Select the correct and site under the correct server.
- Submit the form and Reset the ADF for the server and site.
